

How To Ad A Template To Word Online
In Microsoft Give-and-take, templates are pre-designed documents that y'all or someone else (such equally Microsoft) creates to use as a blueprint for a project. The template could be for a business carte, brochure, resume, presentation…the list goes on. Regardless of the purpose, templates provide the design consistency that any organization (or private) needs to look professional. (You tin also detect templates for Excel, PowerPoint, and other applications, but in this article we're focusing on Microsoft Word.)
The template contains a specific layout, manner, design and, sometimes, fields and text that are common to every use of that template. Some templates are so complete (such as business organisation cards), you simply have to modify the private's name, phone number, and email address. Others, such as business reports or brochures, could require that everything is changed except the layout and design.
Once you create a template, you tin use it over and over. Remember that while you open a template to first a project, you save the project as another file blazon, such as the bones .docx Give-and-take format, for editing, sharing, printing, and more than. The template file stays the same, unless or until you want to change it (more than on that afterwards).
 JD Sartain / IDG Worldwide
 This is a sample template in Microsoft Word.
How to access Microsoft Give-and-take's stock templates
Fortunately for united states of america, Microsoft provides many hundreds of templates for all of its programs. Note that nigh of Microsoft's templates are online, which means you lot cannot access them unless you're connected to the Internet.
To open i of the system-provided templates in Give-and-take:
1. Open Microsoft Discussion and select New.
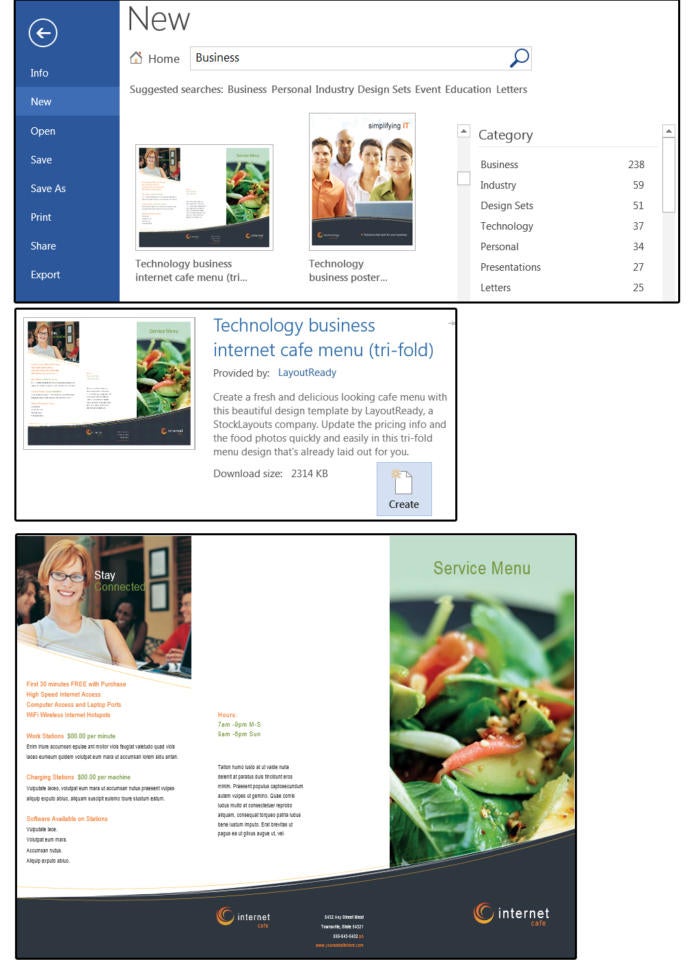
2. Peruse the Suggested Search categories: Business, Personal, Manufacture, Design Sets, Events, Teaching, or Letters. For this exercise, select Business.
3. Word displays a message that says, "Searching thousands of online templates."
4. Word displays template search results on-screen, plus a comprehensive list of categories in a scrolling panel on the correct.
v. Scroll down the page or cull a unlike category, then select a template that fits your electric current projection.
 JD Sartain / IDG Worldwide
 Select a template from a category, then start filling in your own data and images.
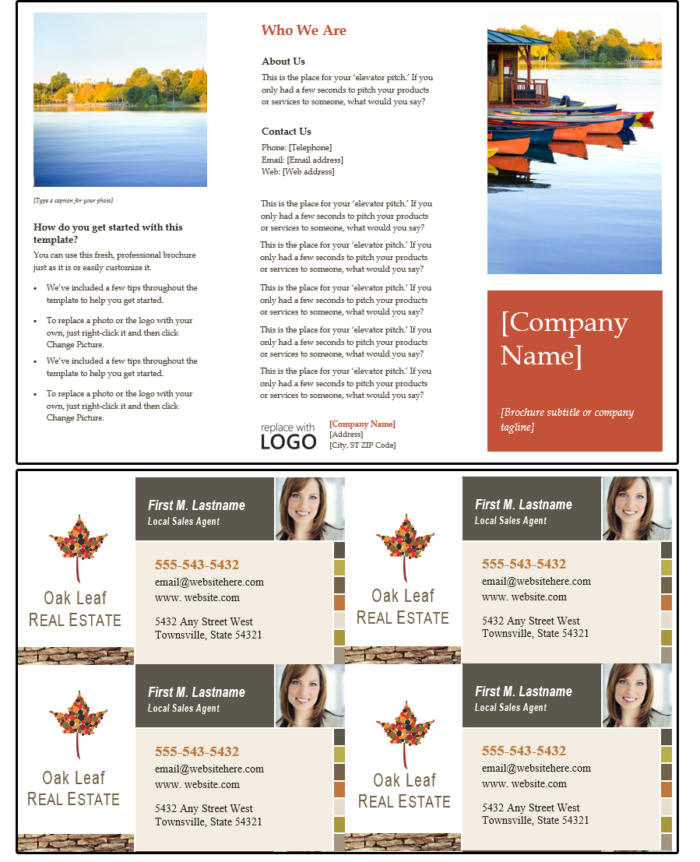
We selected the Internet Café template. Notice the photos, graphics, and principal information, such as hours, are already created in the template. You only have to type over the existing data with your visitor's information, and the brochure is complete.
How to modify a Microsoft Word template
You lot can alter the colors, font, photos, logo, and anything else on this template. If you have not selected the Internet Café brochure, please do then at present. Before y'all make whatsoever changes, become ahead and save this template with a new filename.
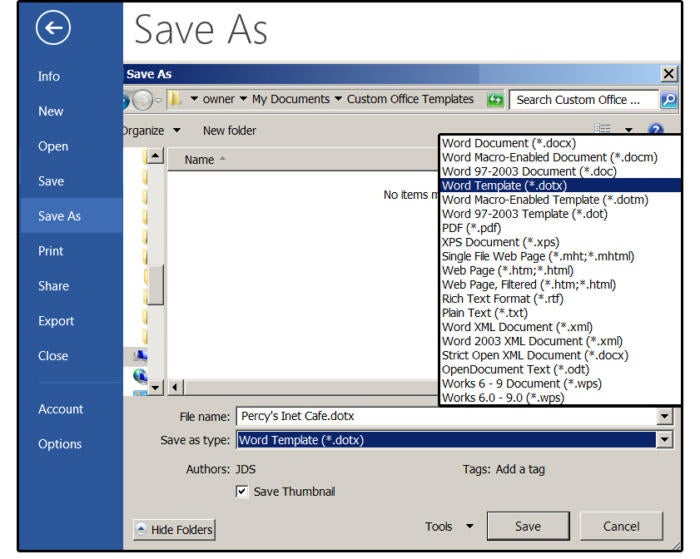
1. If yous follow normal document-saving procedures (and you can here), you lot select File > Save Equally > Computer > Scan. Then navigate to the applicative folder and give the template a new name.
2. Remember that once you click the down arrow beside the Relieve As Type in the input box and select Word Template (*.dotx) from the list (and change the proper noun, of form, in the File Name input box), Microsoft automatically puts the file in its own template folder.
3. Once saved equally a template, close the file.
4. At present open up it again. Note that information technology is not in the folder you specified. Don't panic. Navigate to C:UsersownerDocumentsCustom Office Templates and your custom templates are there. Select the one you just saved from the list and open it.
 JD Sartain / IDG Worldwide
 Save the document as a template.
5. Change the sections on the new template that will exist on every brochure, such as the logo, or contact information. Then salvage it every bit a template over again by pressingCtrl+ S. It volition relieve in the same location.
half dozen. Side by side, fill up in all the other information and save it—this time, equally a document, so y'all can print it out or share it with others.
Whenever you're ready to create a new brochure, just open the template, enter the new data, and save the completed brochure as a certificate.
 JD Sartain / IDG Worldwide
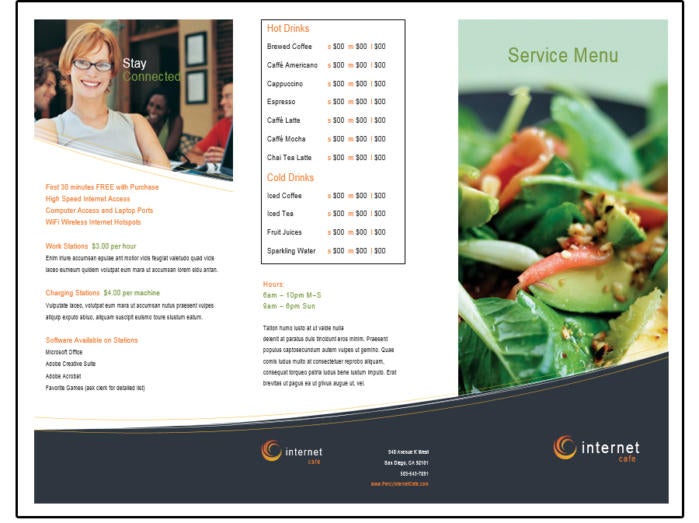
 This Internet Café template has been modified and saved every bit a document brochure.
How to create custom templates in Word
Custom templates can be as simple or complex every bit needed. For case, you might create a template for your company'southward newsletter, posters for a seminar, or invitations for corporate events. You can also create interactive templates to load on the Intranet, so others can fill in the blanks to impress their own envelopes and letterhead, for instance.
First, create a certificate—design and format information technology, add graphics and photos. If it'south interactive, select Controls from the Developer tab and create custom input fields for user interaction.
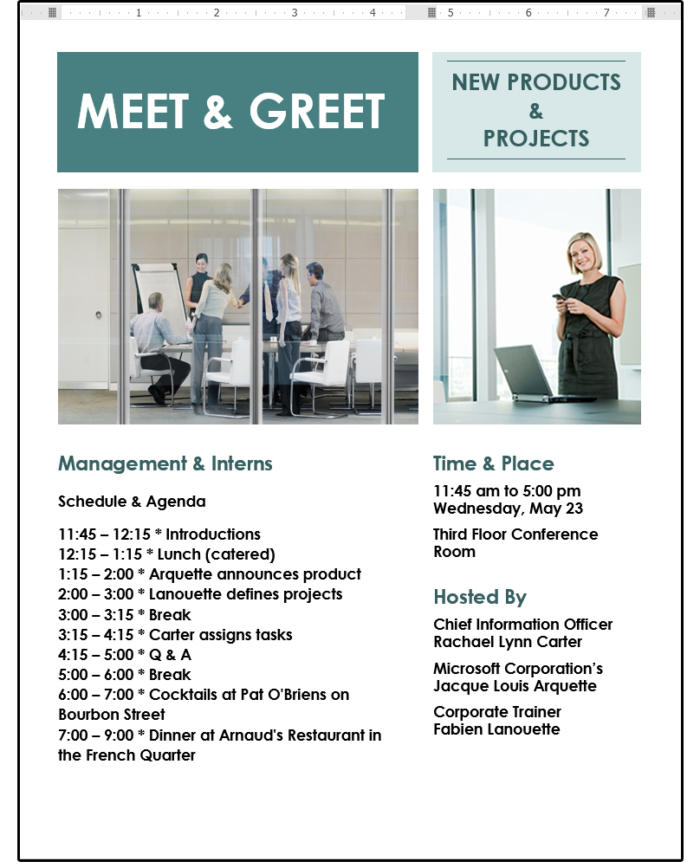
For this exercise, create an proclamation flyer for a See & Greet briefing including lunch, cocktails, and dinner for the company'due south senior management and its new interns.
1. Start with a blank document.
2. Create two columns: The left is 4.v inches and the right is ii.5 inches, and the space between the columns is about iii/8 of an inch. These measurements are but suggestions. Adjust as necessary for your projection and the images and graphics you cull.
three. Add a title.
4. Choose a font (we're choosing Century Gothic), style (sans serif), and color (white), for that championship.
5. Repeat this process for a subtitle. In our example, we're changing the font colour to dark teal.
6. Create some graphic boxes for the title (nighttime teal) and the subtitle (light teal). Select Insert > Shapes and choose a rectangle from the icon listing.
vii. Insert an applicable photo in both columns. Choose Insert > Pictures and select photos from your Pictures Library. Adding images gives you an opportunity to eyeball image sizes and column widths and adjust them as needed.
eight. Enter the schedule and calendar in column ane. Use Century Gothic 14 (in black) for the body text and Century Gothic xviii (in nighttime teal) for the headers.
9. Enter the fourth dimension and place plus the conference hosts in column 2, with the aforementioned fonts and colors for the body text and headers.
 JD Sartain / IDG Worldwide
 Create a custom event template.
x. Once satisfied with the final production, click Relieve Every bit > Encounter+Greet.docx (a regular Word document), and so you lot can share or impress.
11. Earlier you exit, as well relieve this document as a template. Click Salvage As > Save As Type, choose Discussion Template [*.dotx] from the list, and save every bit Encounter+Greet.dotx. Side by side conference, the template is prepare to get you started.
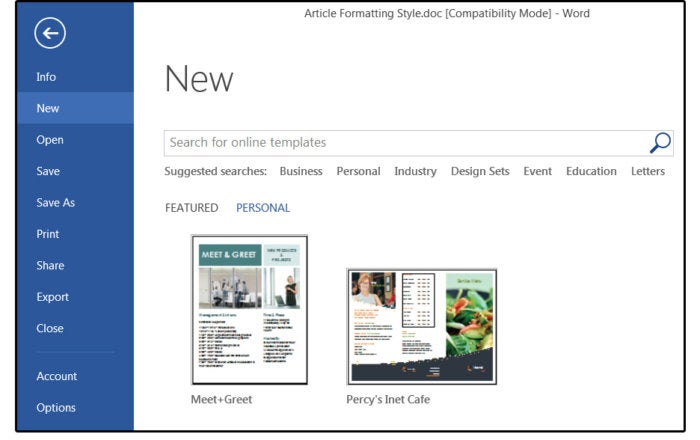
One time yous have some custom templates in your Custom Role Templates folder, when you open up Word and select New, Discussion provides a new category on the backstage menu called Personal. Click this category to meet and open your saved templates.
 JD Sartain / IDG Worldwide
 Open your custom template nether New > Personal.
How to add an interactive component to a template
Some templates utilize interactive controls for user input. For example, imagine that once a month, the branch managers, assistant managers, and loan originators of a large banking institution take a coming together at one of the 12 branches. It's your assistant's job to e-mail the appointment, time, location, speakers, topics, and agenda to each attendee. Rather than have that person retype the information in a regular template, you can create a template where options can exist chosen from a list. For example:
1. First, create the template, and so determine which fields (date, fourth dimension, etc.) tin be selected from a list.
two. Click the Developer tab.
3. Position your cursor on the template where the date goes.
4. Select Insert > Text > Quick Parts > Field, so cull Date from the Categories panel and select a date format from the Properties panel. Click OK. Now the appointment volition update automatically.
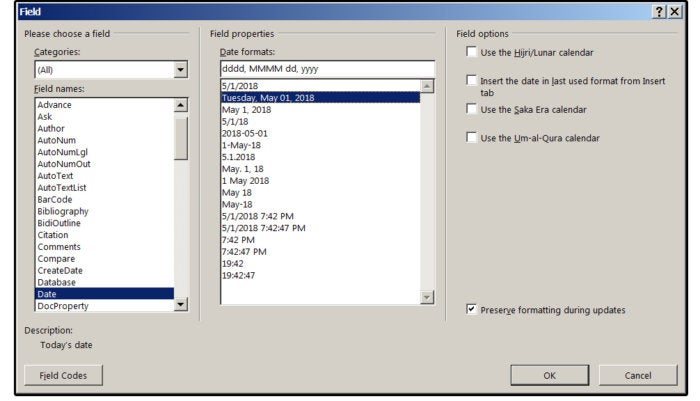 JD Sartain / IDG Worldwide
 Insert a appointment field that automatically updates.
5. Next, position your cursor on the template where the location goes.
half dozen. Select Programmer > Controls > Combo Box Content Control. Discussion places this particular on your template.
7. With the Developer tab withal selected, click Controls > Backdrop, and the Content Control Properties dialog window opens.
8. Click the Add together button, enter a branch name in the Add Pick dialog box, so click OK. Repeat this procedure until all the branch locations are entered, then click OK once more to shut this dialog window.
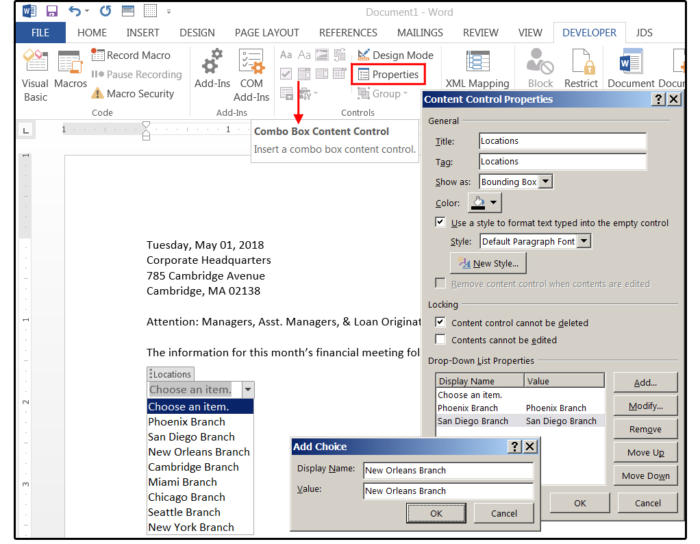 JD Sartain / IDG Worldwide
 Create a Combo Box Control so users can select options from a list.
9. If you want to modify, remove, or motility an entry up or down, highlight the entry, so click the advisable button.
10. You can change the color of the Combo Box frame and change or create a custom style (fonts, colour, attributes, etc.) for the typeface used inside the Philharmonic Box.
xi. Repeat steps 5 through 8 above to create Combo Box Content Controls for the remaining fields: coming together date and time, speakers, and topics.
12. When finished, save the document as a Word Template (*.dotx).
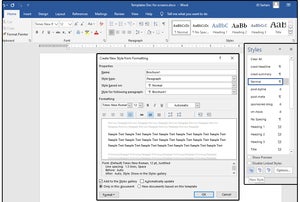
Template tips: how to create custom stylesheets
The default stylesheet in MS Discussion is called normal.dotx. It'southward not a skilful idea to alter this stylesheet because, later on, it could result in some unwanted effects. It'due south all-time to create custom stylesheets for each custom template. For example, the normal.dotx font is Calibri, paragraphs are left aligned, spacing is ane.15, etc. Heading one is Cambria sixteen point, etc. You can alter these settings manually throughout your document without saving them to the normal stylesheet, and before you salvage the document equally a template.
Once satisfied, use those custom settings for your new stylesheet, which could be named something like to the template proper noun. For example, if you're creating a custom brochure template, y'all might name it and the stylesheet Brochure1. Then future brochures volition be much easier to pattern.
one. Cull the Home tab, then click the pocket-size arrow in the bottom right corner of the group called Styles. From the drib-downwards carte, click the New Styles button (bottom left).
2. In the popup dialog Create New Style from Formatting, enter the name of the style, such as Brochure1.
three. Side by side select Paragraph from the Style Type field list, which affects the entire paragraph, as opposed to a Character style, that affects only the characters within a paragraph.
four. You can choose to make the mode based on some other style, such as the Normal way, ane of the Header styles, or No style. If y'all plan to apply most of the formatting features in the Normal manner except a few differences, then base it on the Normal mode. If the custom fashion volition be completely dissimilar, so choose the No style option.
5. Nether Formatting, select a Font and Size, then choose a Font Color such every bit Brown, Alignment such as Justify, Spacing such as 1.xv, and Indents. Notice that the box in the center of the dialog window shows how the paragraph looks with the format options you select.
 JD Sartain / IDG
 How to create a custom stylesheet
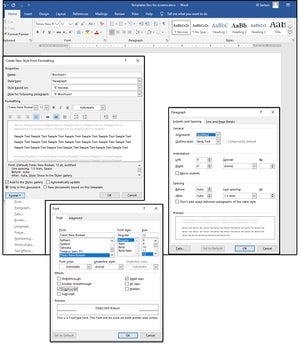
half-dozen. In the lesser left corner, click the Format button. Detect the ix options in the drop-downwards list. In the Font dialog, you can further customize the font options such as font fashion (assuming, italic, etc,), underline style; Sub- and Superscript, Modest Caps, etc.
7. In the Paragraph dialog, you can customize the Indents & Spacing and the Line & Page Breaks. Use the Tabs dialog to customize the alignment and the leader of your tabs, such every bit the dots between the chapter proper name and chapter page number on a table of contents.
8. The Borders & Shading dialog provides Border options such as Box, Shadow, 3D, etc.; and Shading options include colors and patterns. The Linguistic communication characteristic is, of grade, the language of the paragraph such every bit French or Italian. Note that if you want only specific words in some other language, such as c'est la vie in the center of a paragraph, then create a character style chosen French.
9. The Frame selection is actually the Text Wrap feature, which includes how the text wraps effectually a graphic in a paragraph, the spacing around the graphic, and how it's positioned on the page. Choose Numbering to define how you lot desire the numbers to appear such equally the standard arabic numbers, Roman Numerals, or Characters; how they are spaced; and delineated such equally with a period after or parentheses, etc. Bullets are as well defined under this list choice, which provides standard and custom bullets.
10. Next is the Shortcut Key options, which lets you choose a custom Shortcut fundamental for your Paragraph or Character style, such equally Ctrl+B for bold (which is a Discussion default), or define your own. Terminal on the list is Text Effects, which lets you define the colour, slope, pattern, outline, and transparency of a paragraph such as the title on the championship folio of a volume or manual. Additional Text Effects include Shadow, Reflection, Glow, Soft Edges, and 3D Format.
 JD Sartain / IDG
 How to format a custom stylesheet
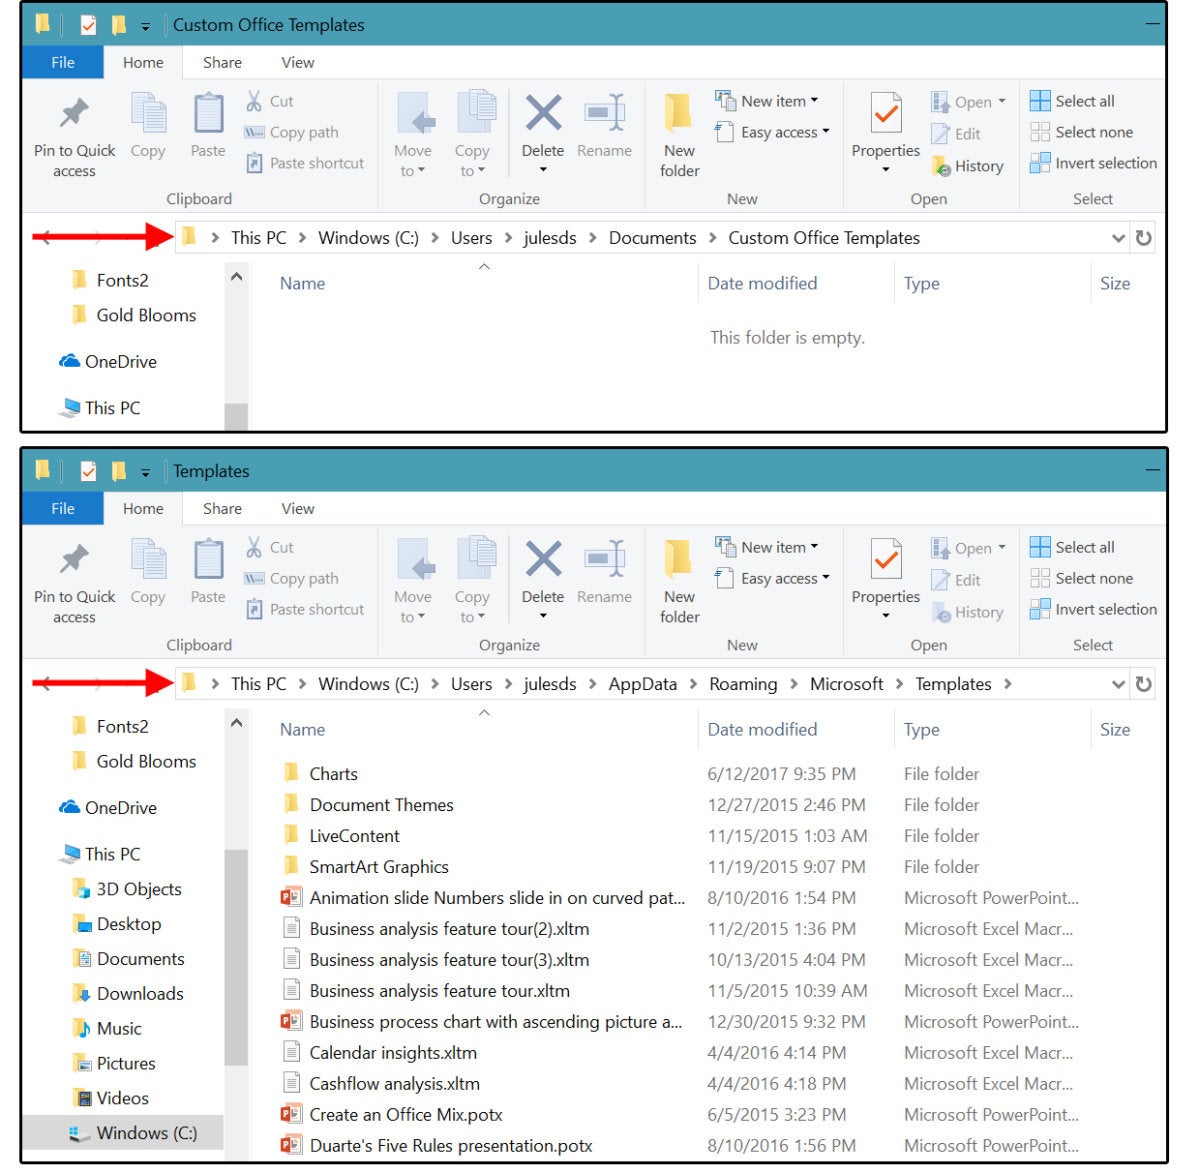
Where to find the template files on your computer
The custom templates that you create or change from 1 of Microsoft's stock templates are stored at C:UsersOwnerDocumentsCustom Office Templates, where <Owner> is your login name. When you open the Users folder, you lot'll see your login name on the list of folders. If not there, information technology should be in the binder that'southward actually called Possessor.
 JD Sartain / IDG Worldwide
 Where the personal custom templates and the stock templates are located
Microsoft stores its templates at:
C:Users<your login name>AppDataRoamingMicrosoftTemplates
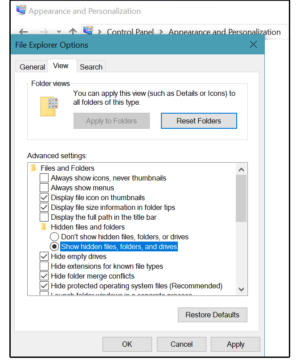
Again, if you lot failed to create a unique login name, this binder may exist called <Owner>. If you tin't discover it, the AppData folder and all of its files and subfolders are hidden.
 JD Sartain / IDG Worldwide
 Evidence Hidden Files and Folders
To view the Hidden files:
- Select the Start/Windows button > Command Panel > Appearance and Personalization
- Select File Explorer Options/Folder Options > Show subconscious files and folders
- On the next screen, check the tick mark beside Testify hidden files, folders, and drives, and so click Apply and OK.
 JD Sartain / IDG Worldwide
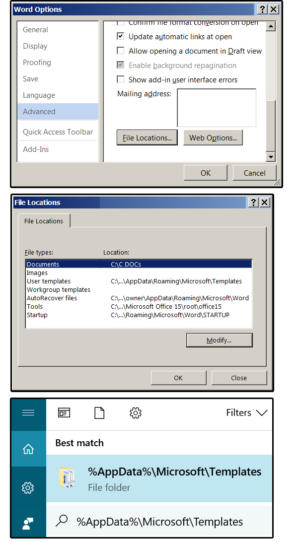
 Two more ways to locate the stock templates binder
To discover the bodily name of the Templates binder:
- Select File > Options > Advanced
- Coil about two-thirds of the way downwardly the screen.
- Click the File Locations button, and the File Locations window appears.
- Discussion displays the locations and paths to all the template-related files.
You lot can likewise click the Kickoff button, then re-create and paste this: %appdata%MicrosoftTemplates in the Search box and printing Enter. The Templates folder appears in the Start box. Double-click to go direct to the stock templates binder.

How To Ad A Template To Word Online,
Source: https://www.pcworld.com/article/401866/microsoft-word-templates-how-to-use-modify-and-create-them.html
Posted by: belewlecurithe.blogspot.com
0 Response to "How To Ad A Template To Word Online"
Post a Comment